After ignoring the whole “agent” hype for a while, I started to get that inevitable feeling of being left behind.
That changed when I came across this blog post explaining the basic flow of an agent. It made me want to try it for myself and see what it actually makes an agent.
This post is my walkthrough of that process: step by step, showing how to turn an LLM into an agent. The code here is mainly illustrative, meant to highlight the concepts rather than provide a fully working solution.
At the end, I share an example of a Software Engineering Agent built with the exact workflows described in this post.
The LLM
Let’s start with a simple LLM workflow. This will be our starting point.
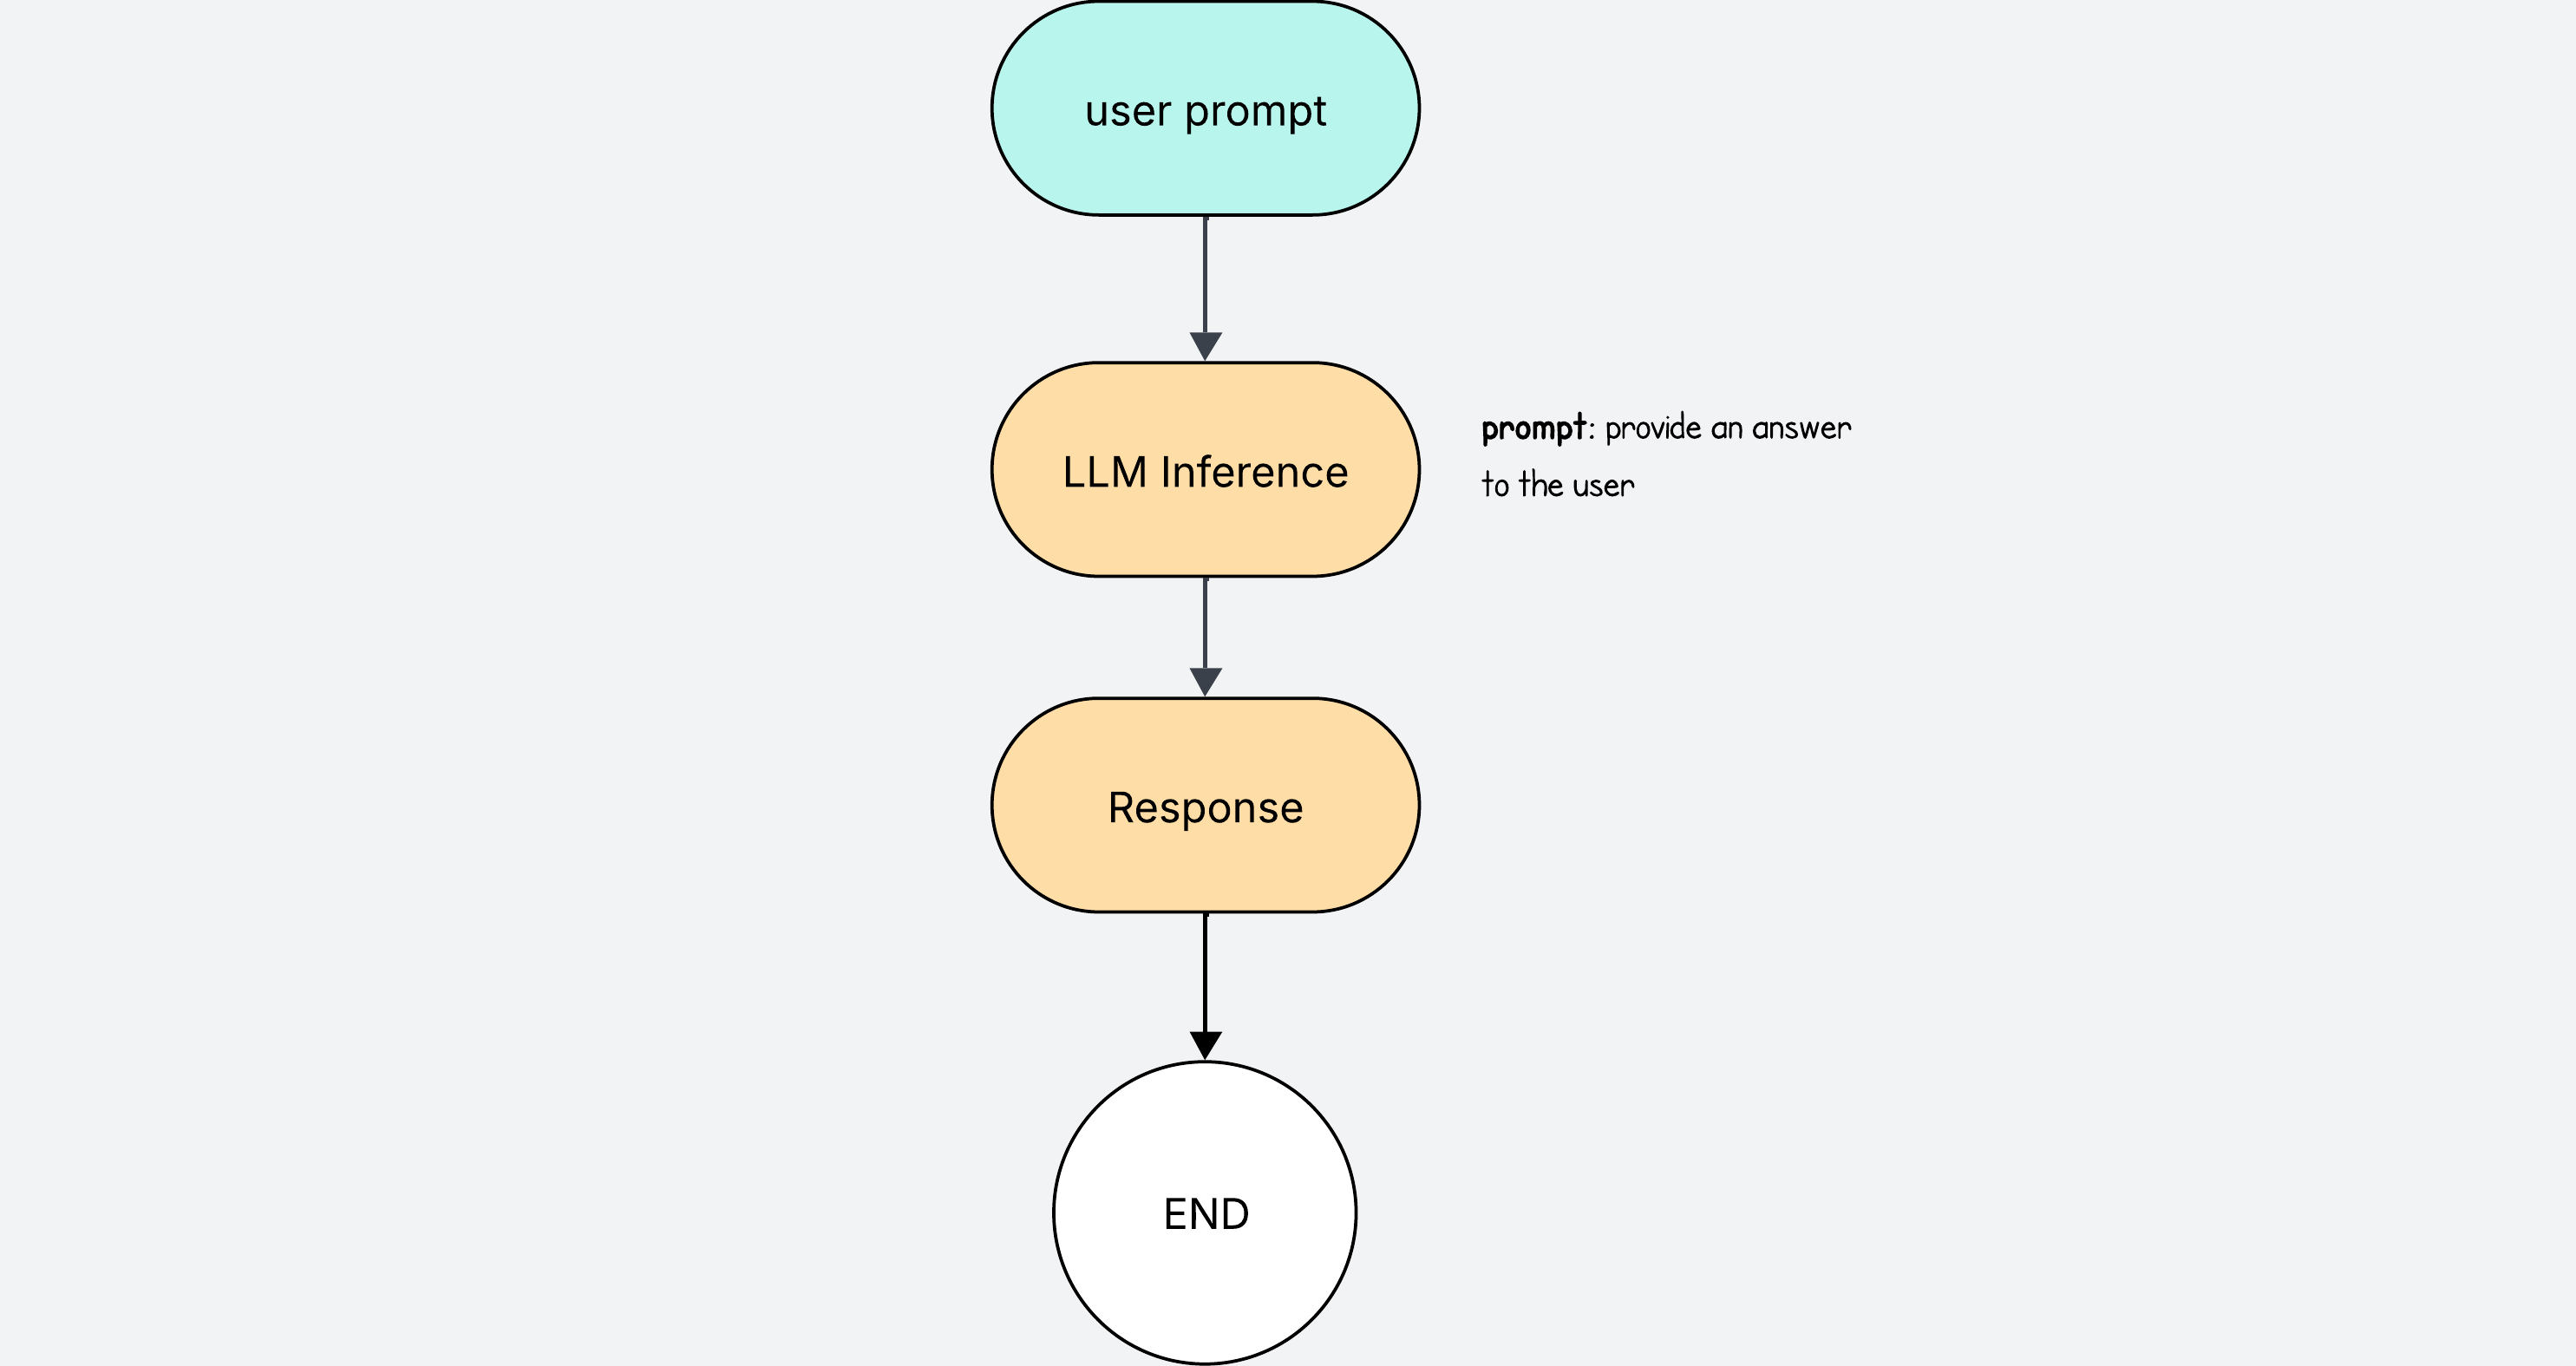
The user writes a prompt, and the LLM returns a response.
This is pretty much how we interact with ChatGPT.
If we were to implement code for this, it would look like this.
user_prompt = "Write unit tests for search.py"
instructions = f"""
You are a coding agent. You need to resolve task: {user_prompt}
"""

response = LLM.chat(instructions)
print("Final answer:", response)
Using Tools
What makes an LLM truly useful is when it can do things on its own.
It is very annoying having to copy the contents of a file, paste them in the ChatGPT window, and ask it to generate some tests that you then paste back to your project.
It is much better if the LLM can write the test directly for us. We can give the LLM access to tools for this.
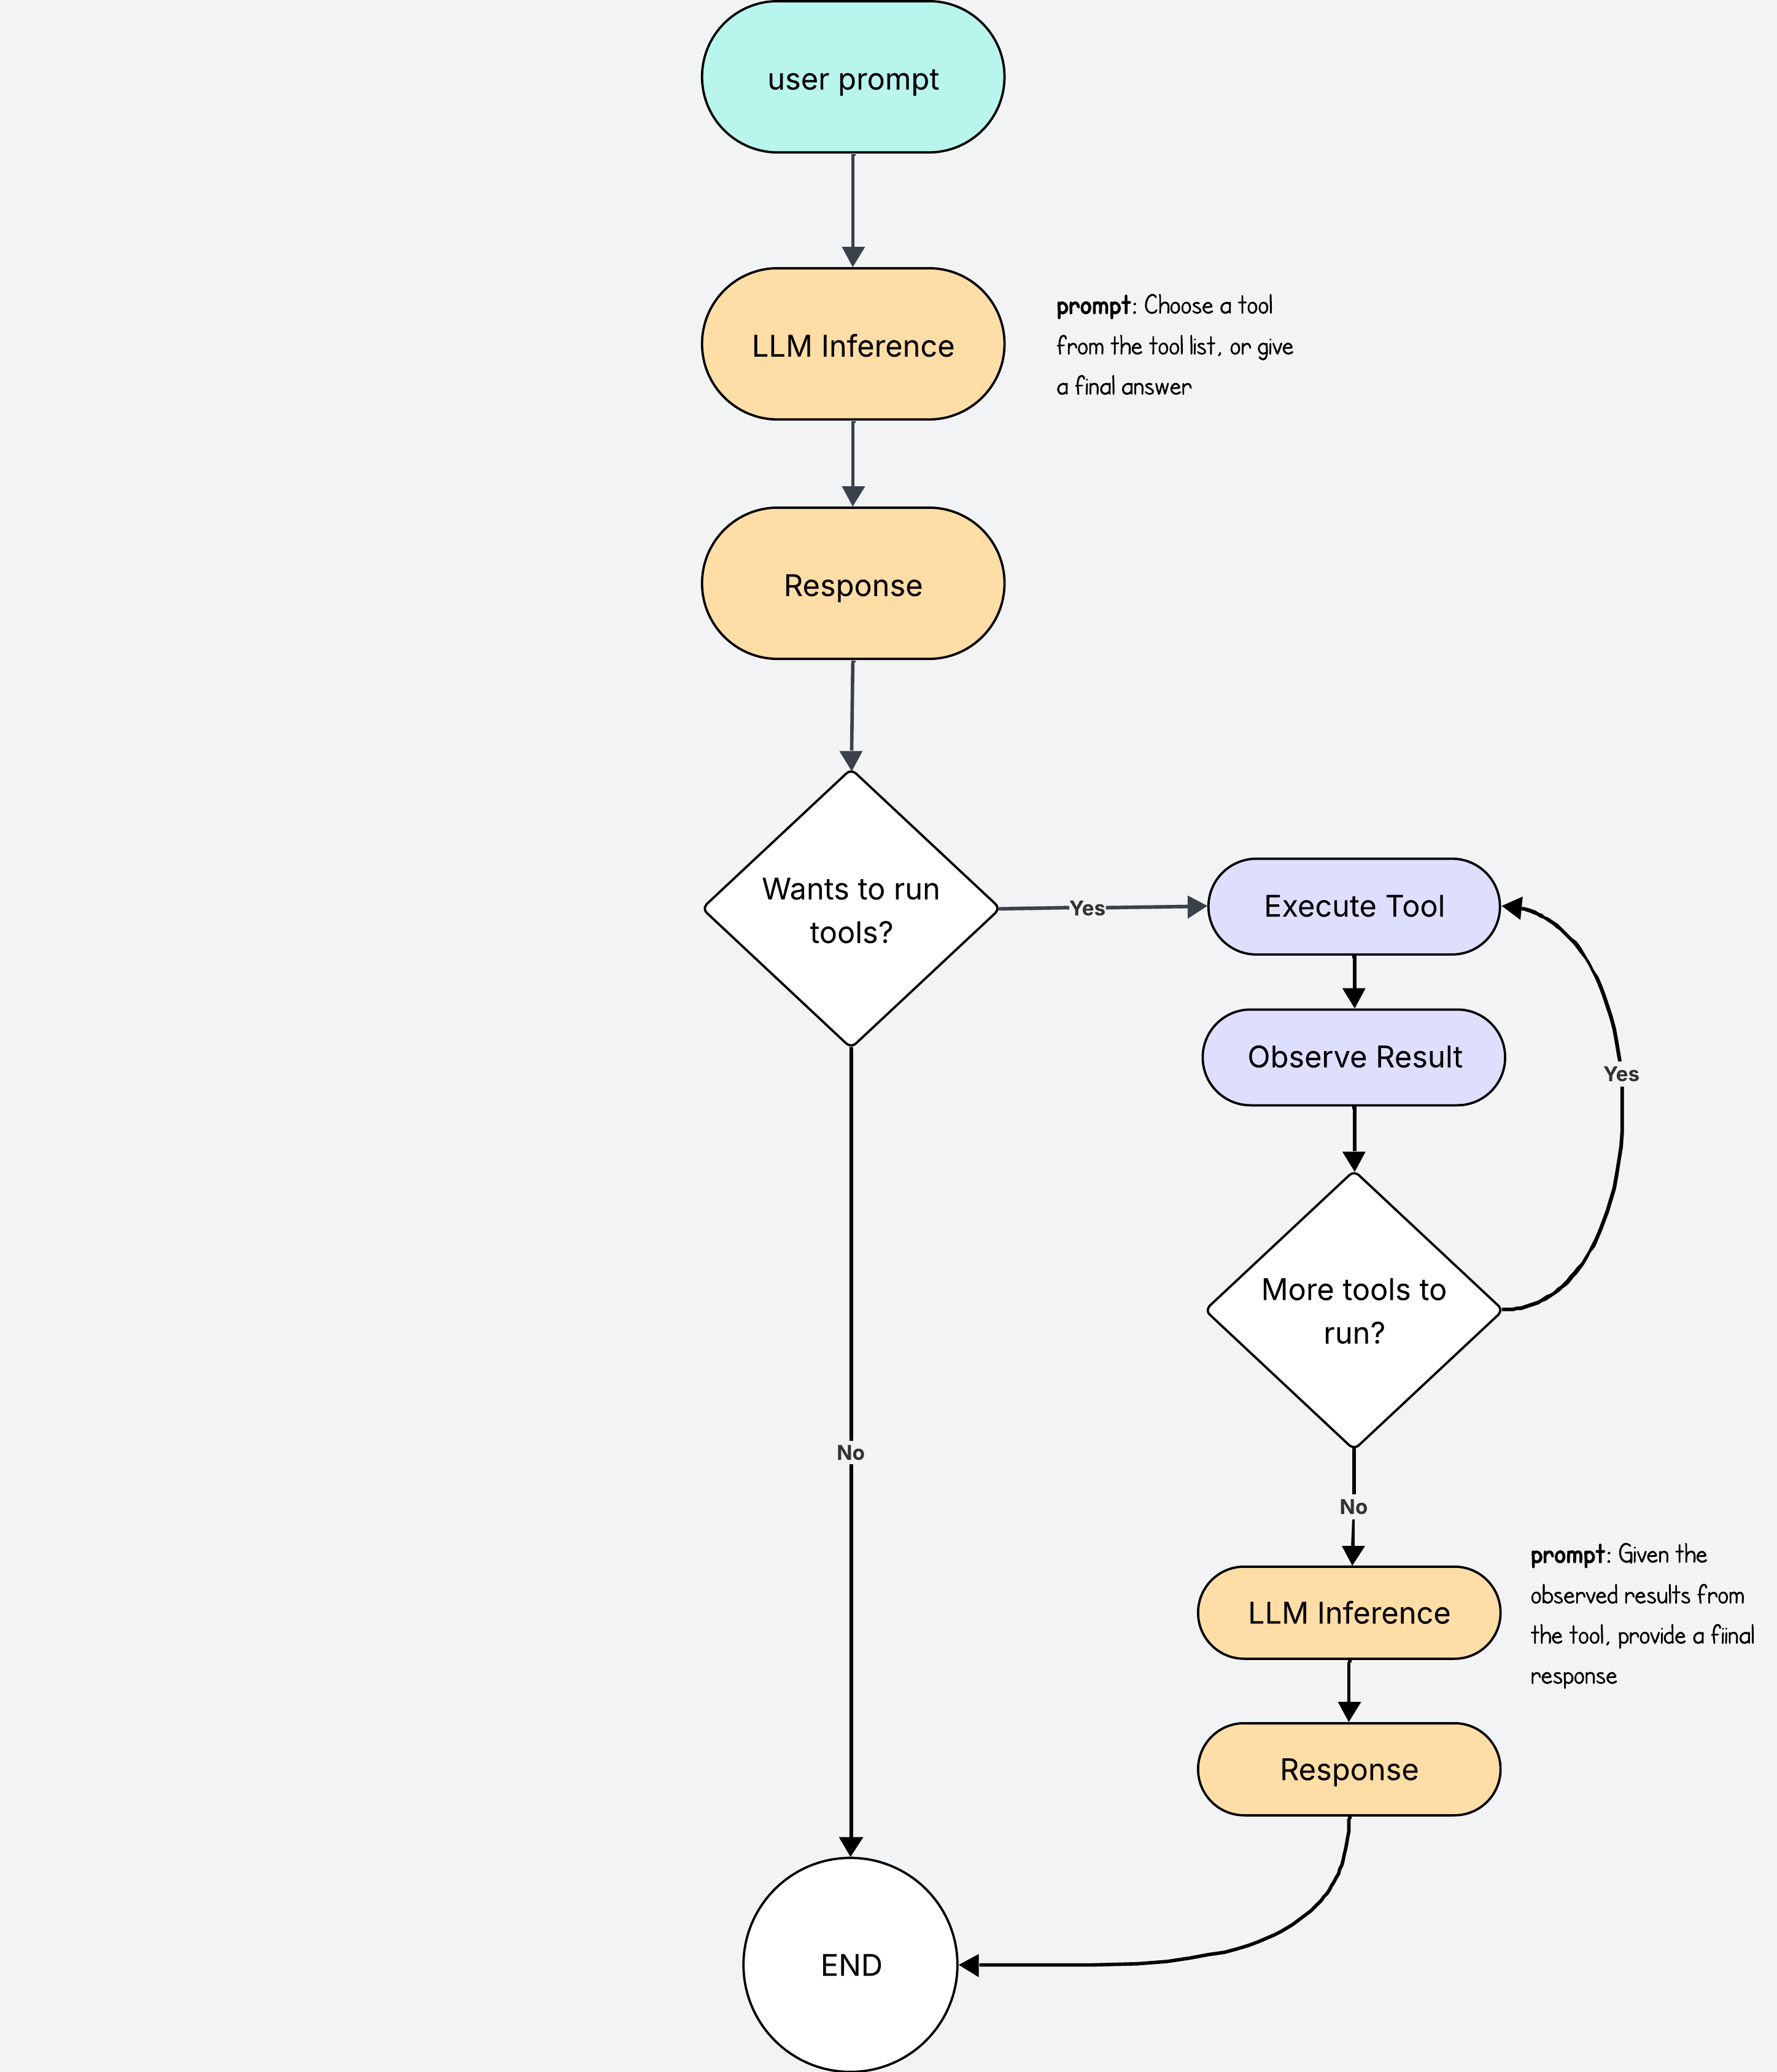
When making the initial LLM call, we provide the list of available tools in the instructions so that it knows which ones to choose.
Structuring the LLM response
The default LLM response will be a bunch of free text. It would make it very hard for us to programmatically find which tools to use based on some free text from the LLM:
Oh yeah, it would be cool if you used the read tool and the write tool to solve this task
Instead, we can “force” the LLM to return an answer in a more structured format which is predictable and we can use to easily find the information we need.
In the instructions, we can provide a detailed JSON schema of how we want the answers to be delivered. In this case we can ask for a response with an answer and a tools section.
In this example, the LLM response contains both an answer section and a tools section. When both are present, the tools section takes priority, and the answer section is ignored while the suggested tools are executed instead.
{
  "answer": "We ignore this answer and run the tools instead",
  "tools": [
    {
      "tool": "read_file",
      "args": {
        "path": "search.py"
      }
    },
    {
      "tool": "write_file",
      ...
   }
  ]
}
Lets look at another example response where the LLM provides an empty list for the tools section.
{
  "answer": "Here are the unit tests for search.py...",
  "tools": []
}
In this example response, we can assume that because it doesn’t need to use any tools, it has all the information it needs, so we treat the answer as the final answer.
Defining the Tools
The next part is defining the tools.
Let’s say for example we are building a coding agent. We can create two functions to read and to write files.
def read_file(path: str) -> str:
    with open(path) as f:
        return f.read()

def write_file(path: str, content: str) -> None:
    with open(path, "w") as f:
        f.write(content)
Now that we have the tools defined, and know what the LLM response looks like, we can start creating our agent logic.
# Import tools we defined eariler
from tools import read_file, write_file

TOOLS = {"read_file": read_file, "write_file": write_file}

user_prompt = "Write unit tests for search.py"
instructions = f"""
You are a coding agent. Use these tools when needed: {list(TOOLS.keys())}.
Otherwise, reply in plain text. Task: {user_prompt}

I want the response to be in the following format:
{"tools": [...], "answer": "text answer here"}
"""

# The response will be in the JSON format we saw earlier
response = LLM.chat(instructions)

if response["tools"]:  # run suggested tools
    history = []
    for action in response["tools"]:
        result = TOOLS[action["tool"]](**action["args"])
        history.append({"action": action, "result": result})

    response = LLM.chat(f"Give a final answer for task {user_prompt} after having executed these actions {history}")

print("Final answer:", response["answer"])
And with this you already have a useful LLM that can independently choose any of the tools available to run all sorts of actions on its own.
Adding a Validation Loop
The thing is, that agents get it wrong all the time.
The best thing we can do to ensure tasks are completed correctly, is to add a validation step before we send the final response to the user.
If we skip this step, it is very likely that the agent will do some of the work, and forget to do the rest, giving the user an incomplete response.
To do the validation, we use an LLM as a judge. We give it the final answer from the agent and the user prompt and ask it if the task was completed. We also give it any other additional information - such as actions executed - that may help it form a final judgement. The answer from the validator LLM will be a simple Yes or No.
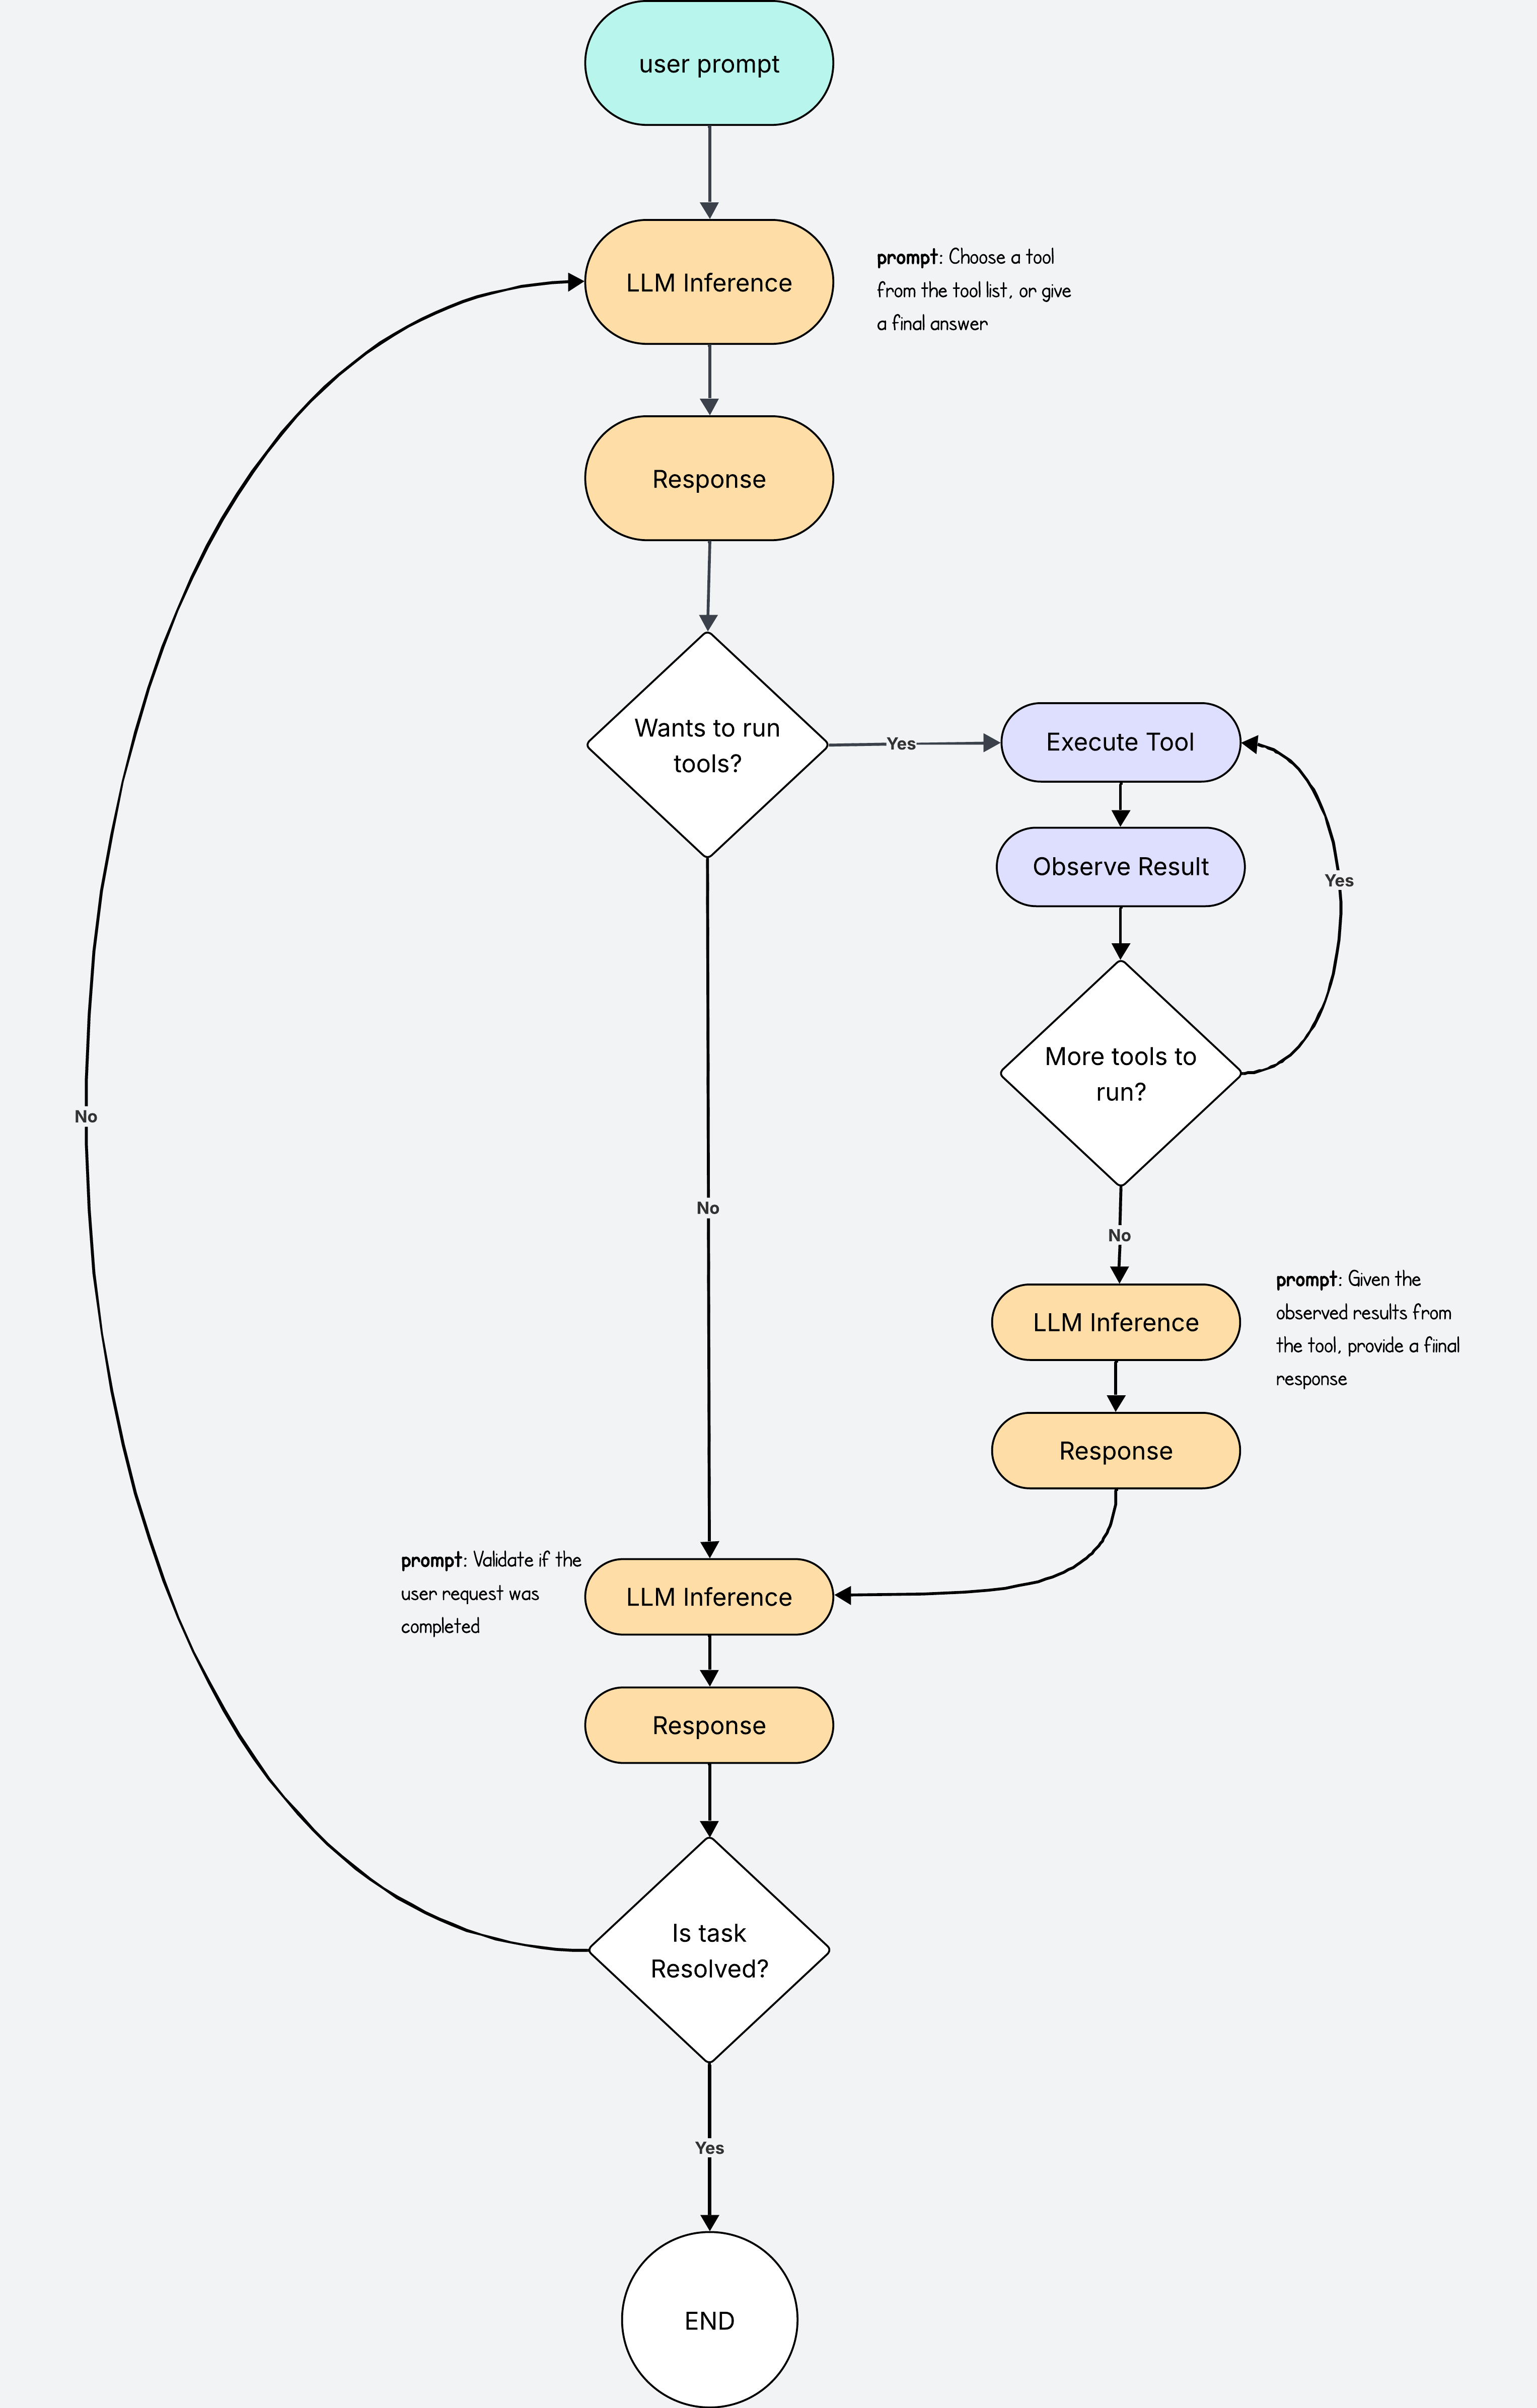
The validation step now checks if the task was completed. If not, the agent loop starts all over again.
Let’s add this functionality to the agent loop:
# ... same as before

response = LLM.chat(instructions)
history = []

while True:
    if response["tools"]:
        for action in response["tools"]:
            result = TOOLS[action["tool"]](**action["args"])
            history.append({"action": action, "result": result})

        response = LLM.chat(f"Give a final answer for task {user_prompt} after having executed these actions {history}")

    # Validation step
    is_done = LLM.chat(
        f"Prompt: {user_prompt}\nHistory: {history}\nHas the task been completed? Reply True/False."
    )

    if is_done == "True":
        break  # exit loop when task resolved

print("Final answer:", response["answer"])
In practical terms, it might be a good idea to add a maximum limit of loop iterations. It will avoid ending in an infinite loop that burns all your money in LLM calls.
With this we have a fully functional LLM agent that can run tasks on its own and verify completion before returning the results.
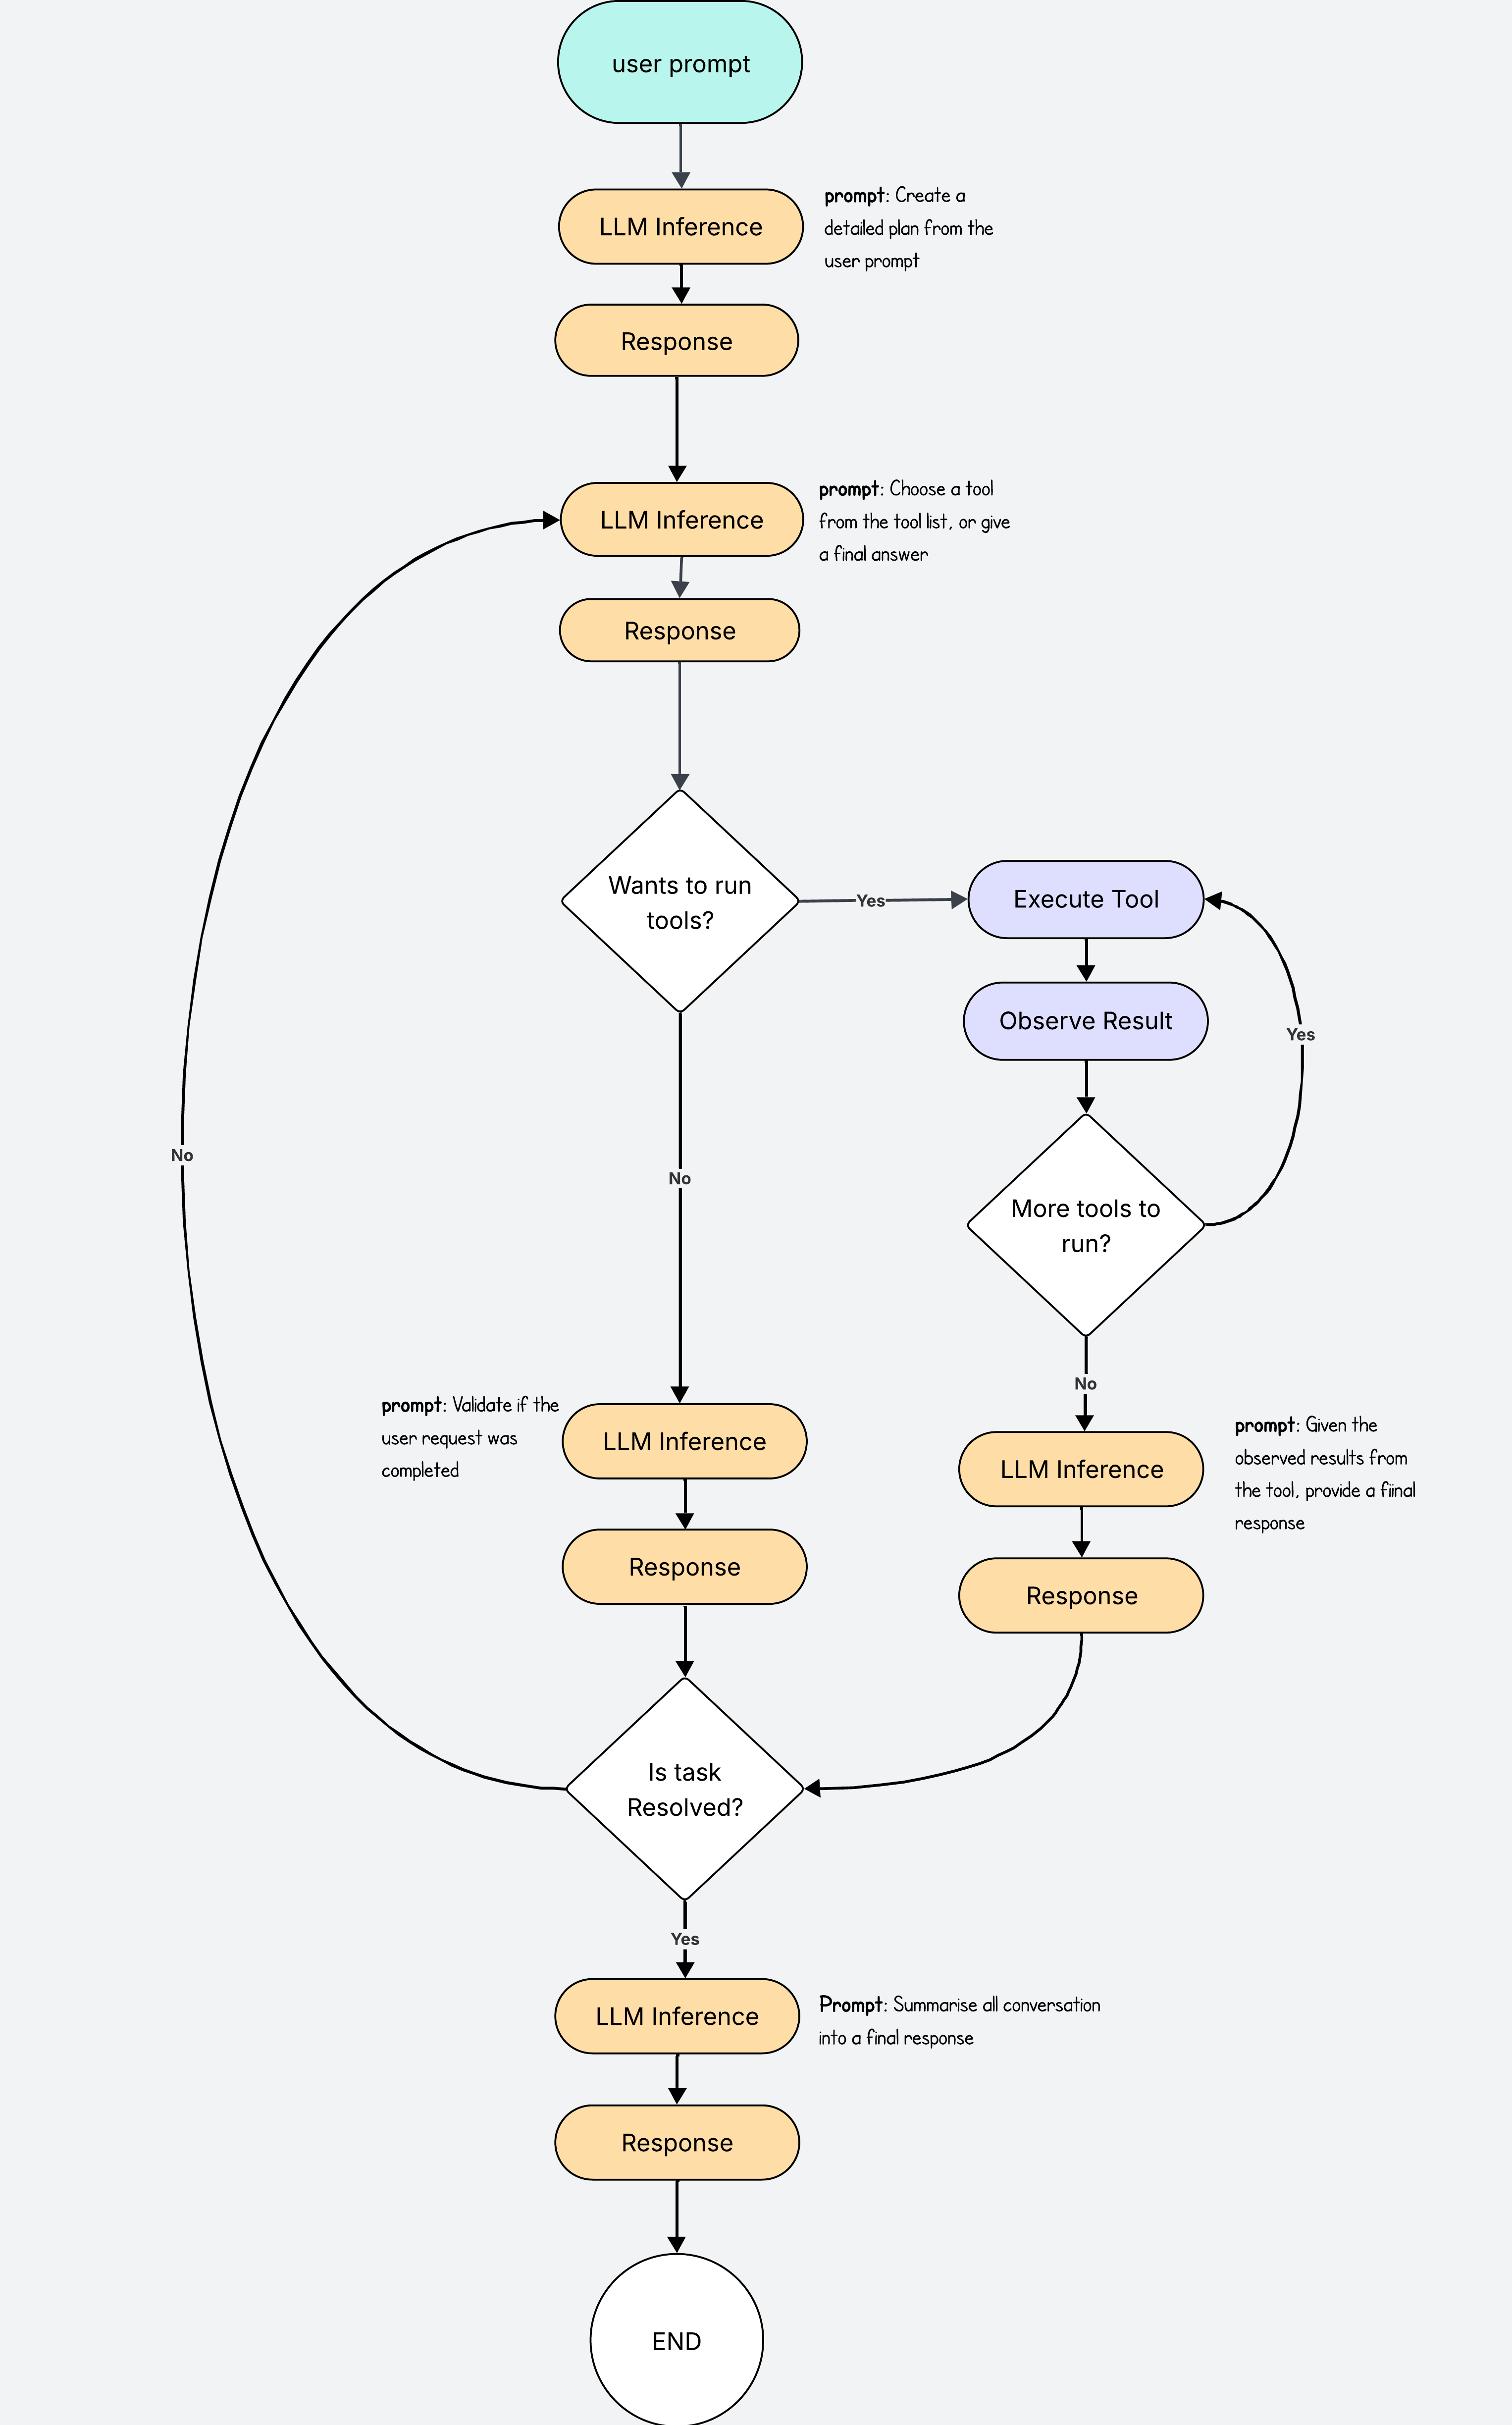
Final Tweaks
We can add a few tweaks here and there to make the agent even more robust.
For example we may decide to add another LLM call at the beginning to turn the user prompt into a detailed plan.
This plan will give the next LLM call more context into how to solve the task so it can choose which tools to use more efficiently.
It will also improve the validation process by checking the results against the detailed plan, and check if all the points were addressed.
In our code we simply add this line after the user prompt, and then we ensure the validation checks against this plan.
plan = llm.chat(f"Break the task into steps: {user_prompt}")
Another nice tweak is to add a final summarising LLM call before we return the response to the user, after it has been validated.
This way the model can take a full view of what’s been done and summarise the outcome into a one nice final answer. This step will ensure much prettier final answers and a nicer user experience.
The Real Thing
I’ve built my own coding agent so I could understand the agent loop better myself.
This agent follows the same loop described in this blog post and it has access to four tools: read files, write files, search files and list files and directories.
In this demo, the agent is asked to create unit tests for a specific file. It first uses the read tool to open search.py, then sends the contents for validation.
The first validation fails, so the process restarts with a new LLM call to choose new tools. With the contents of search.py now in context, the agent uses the write tool to generate the unit tests. The outputs are validated again; this time they pass, and the agent sends the final response to the user.
Final Words
We have just walked through how to go from LLM to agent by adding a few extra steps.
My implementation is not perfect. There are gaps in the code and there are definitely more efficient ways to build the loops. But that is part of the fun. Agents are still raw, still experimental, and the best way to learn is to build your own.
Whether you start from scratch like I did, or use a library like pydantic ai, you will quickly see what works, what breaks, and what needs to be refined.
I hope this gave you both a clear starting point and the push to try it yourself, because there is nothing like that feeling the first time you watch your agent generate code on its own.